How to Record Vocals at Home and Make Them Sound Professional
VP
VocalPresets Team
8 min read
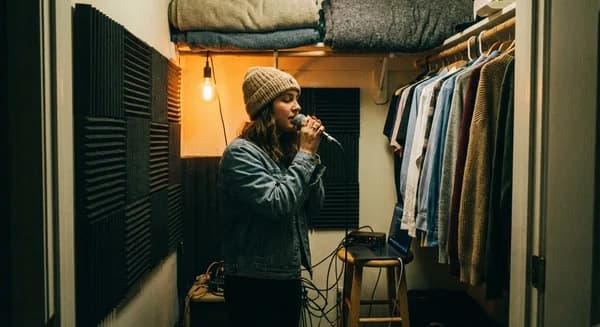
Let's be real about the situation. You are recording in your bedroom. Maybe a closet. Your mic cost under $200. Your "studio" is your laptop, an interface, and whatever room you are sitting in right now. And you want your vocals to sound like what you hear on Apple Music and Spotify.
Good news: that is completely achievable in 2026. The gap between bedroom recordings and professional recordings is not about having a $10,000 microphone. It is about knowing the handful of vocal recording tips that actually matter — and most of them are free.
Your Room Matters More Than Your Mic
This is the thing nobody wants to hear, but it is the truth: a $100 mic in a treated room sounds better than a $500 mic in an untreated bedroom. Your microphone picks up everything — your voice, and every reflection bouncing off your walls, ceiling, and desk.
The cheapest fixes that actually work:
- Record in your closet. If you have a closet with clothes in it, that is one of the best vocal booths money cannot buy. The clothes absorb reflections. The small space has less room for sound to bounce around. It sounds dead in the best possible way.
- Hang thick blankets. Behind you and on any hard wall near the mic. Moving blankets from a hardware store cost $15-20 and make a real difference. Tack them up, drape them over a mic stand — however you can get them between your voice and the walls.
- Use a reflection filter. Those curved shields that attach to your mic stand ($30-50 on Amazon). They are not magic, but they reduce the room sound getting into the back and sides of your mic. Worthwhile if you cannot treat the whole room.
- Avoid the center of the room. Corners and the middle of a room have the worst acoustic issues. Offset yourself toward a wall with treatment.
- Cover hard surfaces near the mic. Your desk, monitor screen, and any flat surface within 3 feet of the mic reflects sound back into it. Drape a blanket over your desk during recording sessions. It sounds excessive but it works.
You do not need your room to sound like a professional studio. You just need to reduce the room sound enough that it is not obviously a bedroom. That is a much lower bar than you think.
Choosing the Right Mic for Your Space
You have two realistic options:
Large-diaphragm condenser (AT2020, Rode NT1, Audio-Technica AT4040): These capture the most detail, warmth, and presence. They also capture every room reflection. Use these if you have done some acoustic treatment — even just blankets and a closet.
Dynamic mic (Shure SM7B, Rode PodMic, SM58): These reject off-axis sound, meaning they are more forgiving in untreated rooms. You trade some high-end detail for less room noise. The SM7B specifically has become the go-to for rappers recording at home because of how well it isolates your voice from everything else.
If your room is untreated and you cannot do anything about it, go dynamic. If you can hang some blankets and record in a corner or closet, a condenser will give you a more polished sound.
Budget Mic Recommendations
| Budget | Condenser | Dynamic |
|---|---|---|
| Under $100 | Audio-Technica AT2020 | Samson Q2U |
| $100-200 | Rode NT1 (5th Gen) | Rode PodMic |
| $200-400 | Audio-Technica AT4040 | Shure SM7B (with Cloudlifter) |
At any of these price points, you can record vocals that sound professional with the right technique and processing.
The Audio Interface
You need one. This is non-negotiable. Your laptop's built-in audio is not designed for recording vocals.
Solid options under $150: Focusrite Scarlett 2i2, PreSonus AudioBox USB 96, SSL 2. Any of these will give you clean, professional-quality audio. The difference between a $100 interface and a $500 interface is subtle — the difference between no interface and any interface is massive.
What to look for: 48V phantom power (required for condenser mics), at least one XLR input, USB-C connectivity, and a headphone output with its own volume knob. Every interface listed above checks all these boxes.
Recording Setup That Makes a Difference
Mic distance: 4-6 inches from the mic with a pop filter in front. Too close and your voice sounds boomy (proximity effect). Too far and you get more room sound. The pop filter stops plosive sounds (hard P and B) from hitting the mic.
Gain staging: Set your interface gain so the loudest moment of your performance hits around -12 to -6 dBFS on your DAW's meter. This gives you headroom. If you clip (hit 0 dBFS), that distortion is permanent and harsh. Always leave room.
How to set your gain properly: Play back your loudest section while adjusting the gain knob on your interface. Watch the meter in your DAW. You want the loudest peaks sitting around -6 dBFS. It is always better to record too quiet than too loud — you can turn a quiet recording up, but you cannot fix clipping.
Monitor through headphones: Use closed-back headphones so the beat does not bleed into the mic. Keep the volume at a comfortable level — blasting the beat in your headphones leaks into condenser mics and makes you sing or rap louder than you need to.
Kill background noise before you hit record: Turn off the AC. Close the window. Shut the door. Tell your roommate you need 30 minutes. The cleanest recording you can get means less work fixing problems later and better results from every plugin.
Record a few seconds of silence first. Before you start your take, let the mic capture 3-5 seconds of room silence. This gives noise removal tools a clean noise profile to work with and makes cleanup dramatically more effective.
Clean Up Before You Process
Even with a good setup, bedroom recordings usually have some noise, room tone, or subtle issues. Before any vocal chain touches your recording, VocalEnhancer.com can handle noise removal and clarity enhancement. Better raw material means better results from everything you put after it.
Apply a Vocal Preset
Once your recording is clean, this is where it goes from "bedroom demo" to "this sounds like a real song." A professional vocal preset applies the complete vocal chain — compression, EQ, saturation, reverb — in one click.


Load one, adjust the compression and EQ for your specific voice, and focus on what you actually care about: performing. The engineering is handled.
If you are not sure which preset fits your style, start with free vocal presets to test different sounds on your own recordings before committing to a full pack.
Record Multiple Takes (This Is Not Optional)
Every professional recording session uses multiple takes. Three full takes minimum for any important section. Then you comp — pick the best moments from each take and piece them together. That perfect-sounding vocal on your favorite song? It is probably comped from five or six takes.
This is not a sign of weakness. This is how records are made.
How to comp effectively: Record all your takes on separate playlist lanes (most DAWs support this — Logic, FL Studio, Ableton all have take/comp features). Listen through each take and highlight the best phrases. Crossfade between selections at natural breath points so the edits are invisible.
Troubleshooting Common Recording Problems
Plosives (popping P and B sounds): Your pop filter is not close enough to the mic, or you do not have one. Position the pop filter 2-3 inches in front of the mic capsule. If you still get pops, angle the mic slightly off-axis so your breath does not hit it directly.
Sibilance (harsh S and T sounds): Some voices are naturally sibilant. Angle the mic slightly off-axis (point it at your chin or cheek instead of straight at your mouth). This reduces high-frequency harshness at the source, which is easier than fixing it with a de-esser later.
Proximity effect (boomy bass when too close): Back up from the mic. If you like being close for intimacy, use the high-pass filter on your interface (if it has one) or apply one in your DAW set to 80-100Hz.
Inconsistent volume between sections: This is normal and expected. Compression handles it in the mix. But you can minimize it by maintaining consistent distance from the mic and controlling your dynamics with mic technique — pull back slightly on louder phrases, lean in on quieter ones.
Background noise that won't go away: If you cannot eliminate the source, try recording at a different time (late night is usually quietest). A dynamic mic picks up less ambient noise than a condenser. Noise removal tools can handle moderate background noise but struggle with loud or intermittent sounds.
What Your Budget Actually Gets You
| Budget | What to Get | What It Sounds Like |
|---|---|---|
| $0 | Phone in a closet + GarageBand | Surprisingly decent for demos |
| $100-200 | USB interface + pop filter | Clean enough for release with processing |
| $300-500 | Quality mic + basic room treatment | Professional. Seriously. |
| $500+ | Better acoustic treatment + reflection filter | Diminishing returns from here |
At $300-500 invested, you can record vocals that — with the right processing — genuinely compete on streaming platforms. The artists you are comparing yourself to are not all recording in million-dollar studios. Many of them started exactly where you are.
The investment in a vocal preset pack pays off at every budget level. It turns whatever setup you have right now into a professional vocal chain without requiring you to learn years of mixing technique.
Frequently Asked Questions
What is the single most important thing for recording good vocals at home? Room treatment. A $100 mic in a closet with clothes sounds better than a $500 mic in a bare bedroom. Reduce reflections first, then worry about gear. After room treatment, proper gain staging is the next biggest factor.
Should I record in mono or stereo? Mono. Always. Your vocal is a single source coming from one point. Recording in stereo just captures more room sound and creates phasing issues. Record mono, then use stereo effects (reverb, delay, widening) during mixing.
How do I know if my recording quality is good enough to release? Listen for three things: no audible room echo, no background noise between phrases, and no clipping or distortion on loud moments. If your raw recording passes those three checks, it is good enough for a vocal preset and processing chain to make it release-ready.
Do I need acoustic panels or are blankets enough? Blankets are enough for most bedroom setups. Professional acoustic panels are more effective per square foot, but moving blankets at $15-20 each cover more area for less money. If you can only afford one upgrade, blankets behind and beside your mic position make the biggest difference.
Browse vocal presets to find the right sound for your recordings. Available for FL Studio, Logic Pro, and Ableton Live.
Related: How to Build a Vocal Chain | Vocal Chain Order | Complete Vocal Stack for Bedroom Producers